Drywall Taping in Stone Ridge, NY
Drywall Taping, Joint Compound & Paint-Ready Finishing
Newly installed drywall is not ready for primer or paint simply because the panels have been fastened to the framing. Factory edges, butt joints, inside corners, outside corners, screw heads, transitions, and small gaps must be taped, compounded, feathered, sanded, and reviewed before the surface can receive a clean painted finish.
Hudson Valley Home Painters provides drywall taping and finishing for newly installed or unfinished drywall in garages, additions, renovated rooms, utility spaces, basements, ceilings, and other residential areas throughout Stone Ridge and the Hudson Valley.
This service is separate from isolated drywall repair. Drywall repair addresses holes, cracks, loose tape, failed patches, and damaged areas. Drywall taping addresses the seams, corners, fasteners, and transitions across newly installed or unfinished wallboard. For isolated repairs, visit our paint prep and drywall repair page.
Drywall Taping Services May Include
- Taping newly installed drywall seams
- Finishing factory-edge joints and butt joints
- Inside-corner taping and compound work
- Outside-corner and corner-bead finishing
- Covering drywall screws and approved fasteners
- Applying multiple coats of joint compound where required
- Feathering transitions between drywall panels
- Sanding ridges, tool marks, and high spots
- Preparing unfinished drywall for separately quoted primer and paint
Drywall Taping and Patching in the Same Project
A newly boarded room may contain continuous seams, butt joints, inside corners, rows of fasteners, ceiling joints, and transitions that must be taped and finished as a complete system. Drywall taping is not limited to covering one patch. It includes reinforcing panel joints, embedding tape in joint compound, covering fasteners, applying additional coats, feathering the transitions, and sanding the finished seams before primer and paint.
The example below comes from the same garage project in Woodstock shown on our paint prep and drywall repair page. An open ceiling area first required new Sheetrock to be measured, fitted, and secured. Once the panels were installed, the new edges, butt joints, fasteners, and transitions still required drywall tape and compound work to connect the patch to the surrounding ceiling.
That room contained both new and existing material. Newly installed sections required taping and finishing, while isolated openings, loose tape, prior patches, and older mixed-condition surfaces required targeted repair. Each area was handled according to its actual condition rather than treating the entire ceiling as one uniform scope.
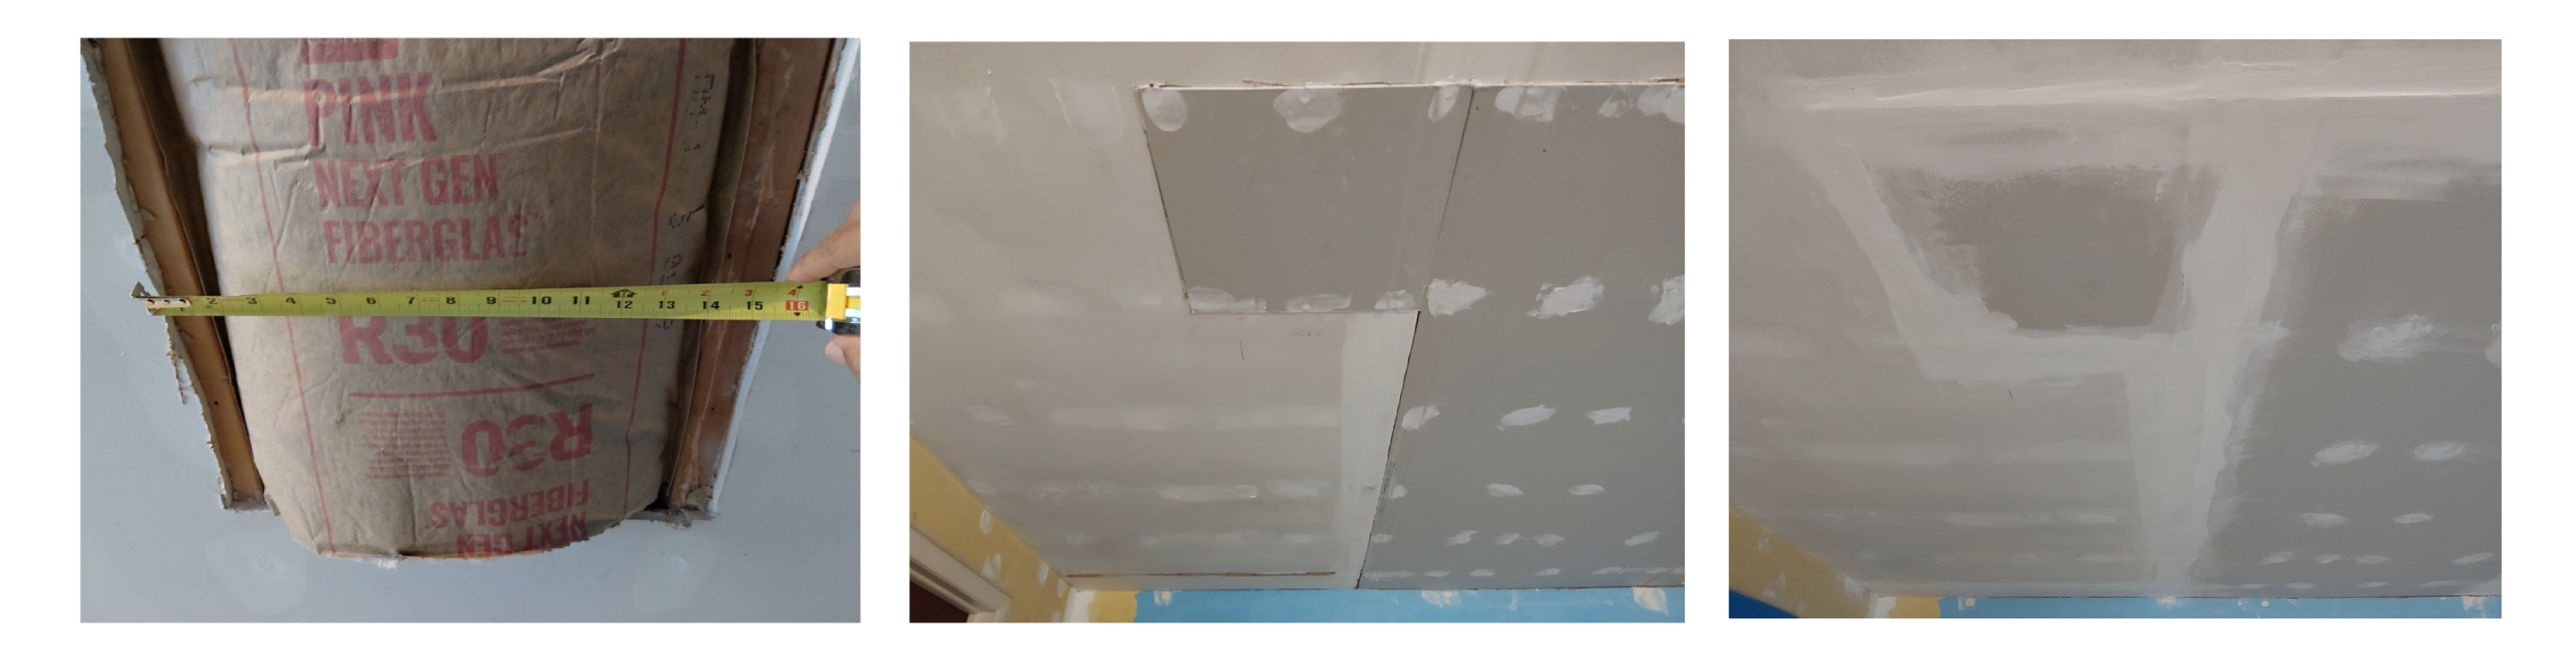
This Woodstock project required both Sheetrock patching and complete taping of the new seams, fasteners, and transitions before the ceiling could be prepared for primer and paint.
Taping Seams, Corners & Fasteners
Drywall tape must be embedded in wet joint compound so the seam is reinforced rather than merely covered. Additional coats are then applied to build and widen the transition gradually. Heavy compound placed in one pass can create humps, long drying times, cracking, and unnecessary sanding.
Inside corners, outside corners, butt joints, factory edges, fastener heads, and transitions each require a different approach. The compound must be shaped and feathered so the finished surface moves gradually from the joint into the face of the drywall.
Taping and Finishing an Exposed Drywall Joint
Once a drywall joint has been exposed and unstable material has been removed, the seam must be reinforced before it can be finished. Simply filling the open joint with compound does not provide the same reinforcement as correctly applied drywall tape.
In this sequence, fiberglass mesh tape was centered continuously over the exposed vertical joint. Setting-type joint compound was then applied through and over the mesh to fill and stabilize the seam. After the initial application set, a wider finishing coat was added and feathered into the surrounding wall in preparation for final sanding, primer, and paint.
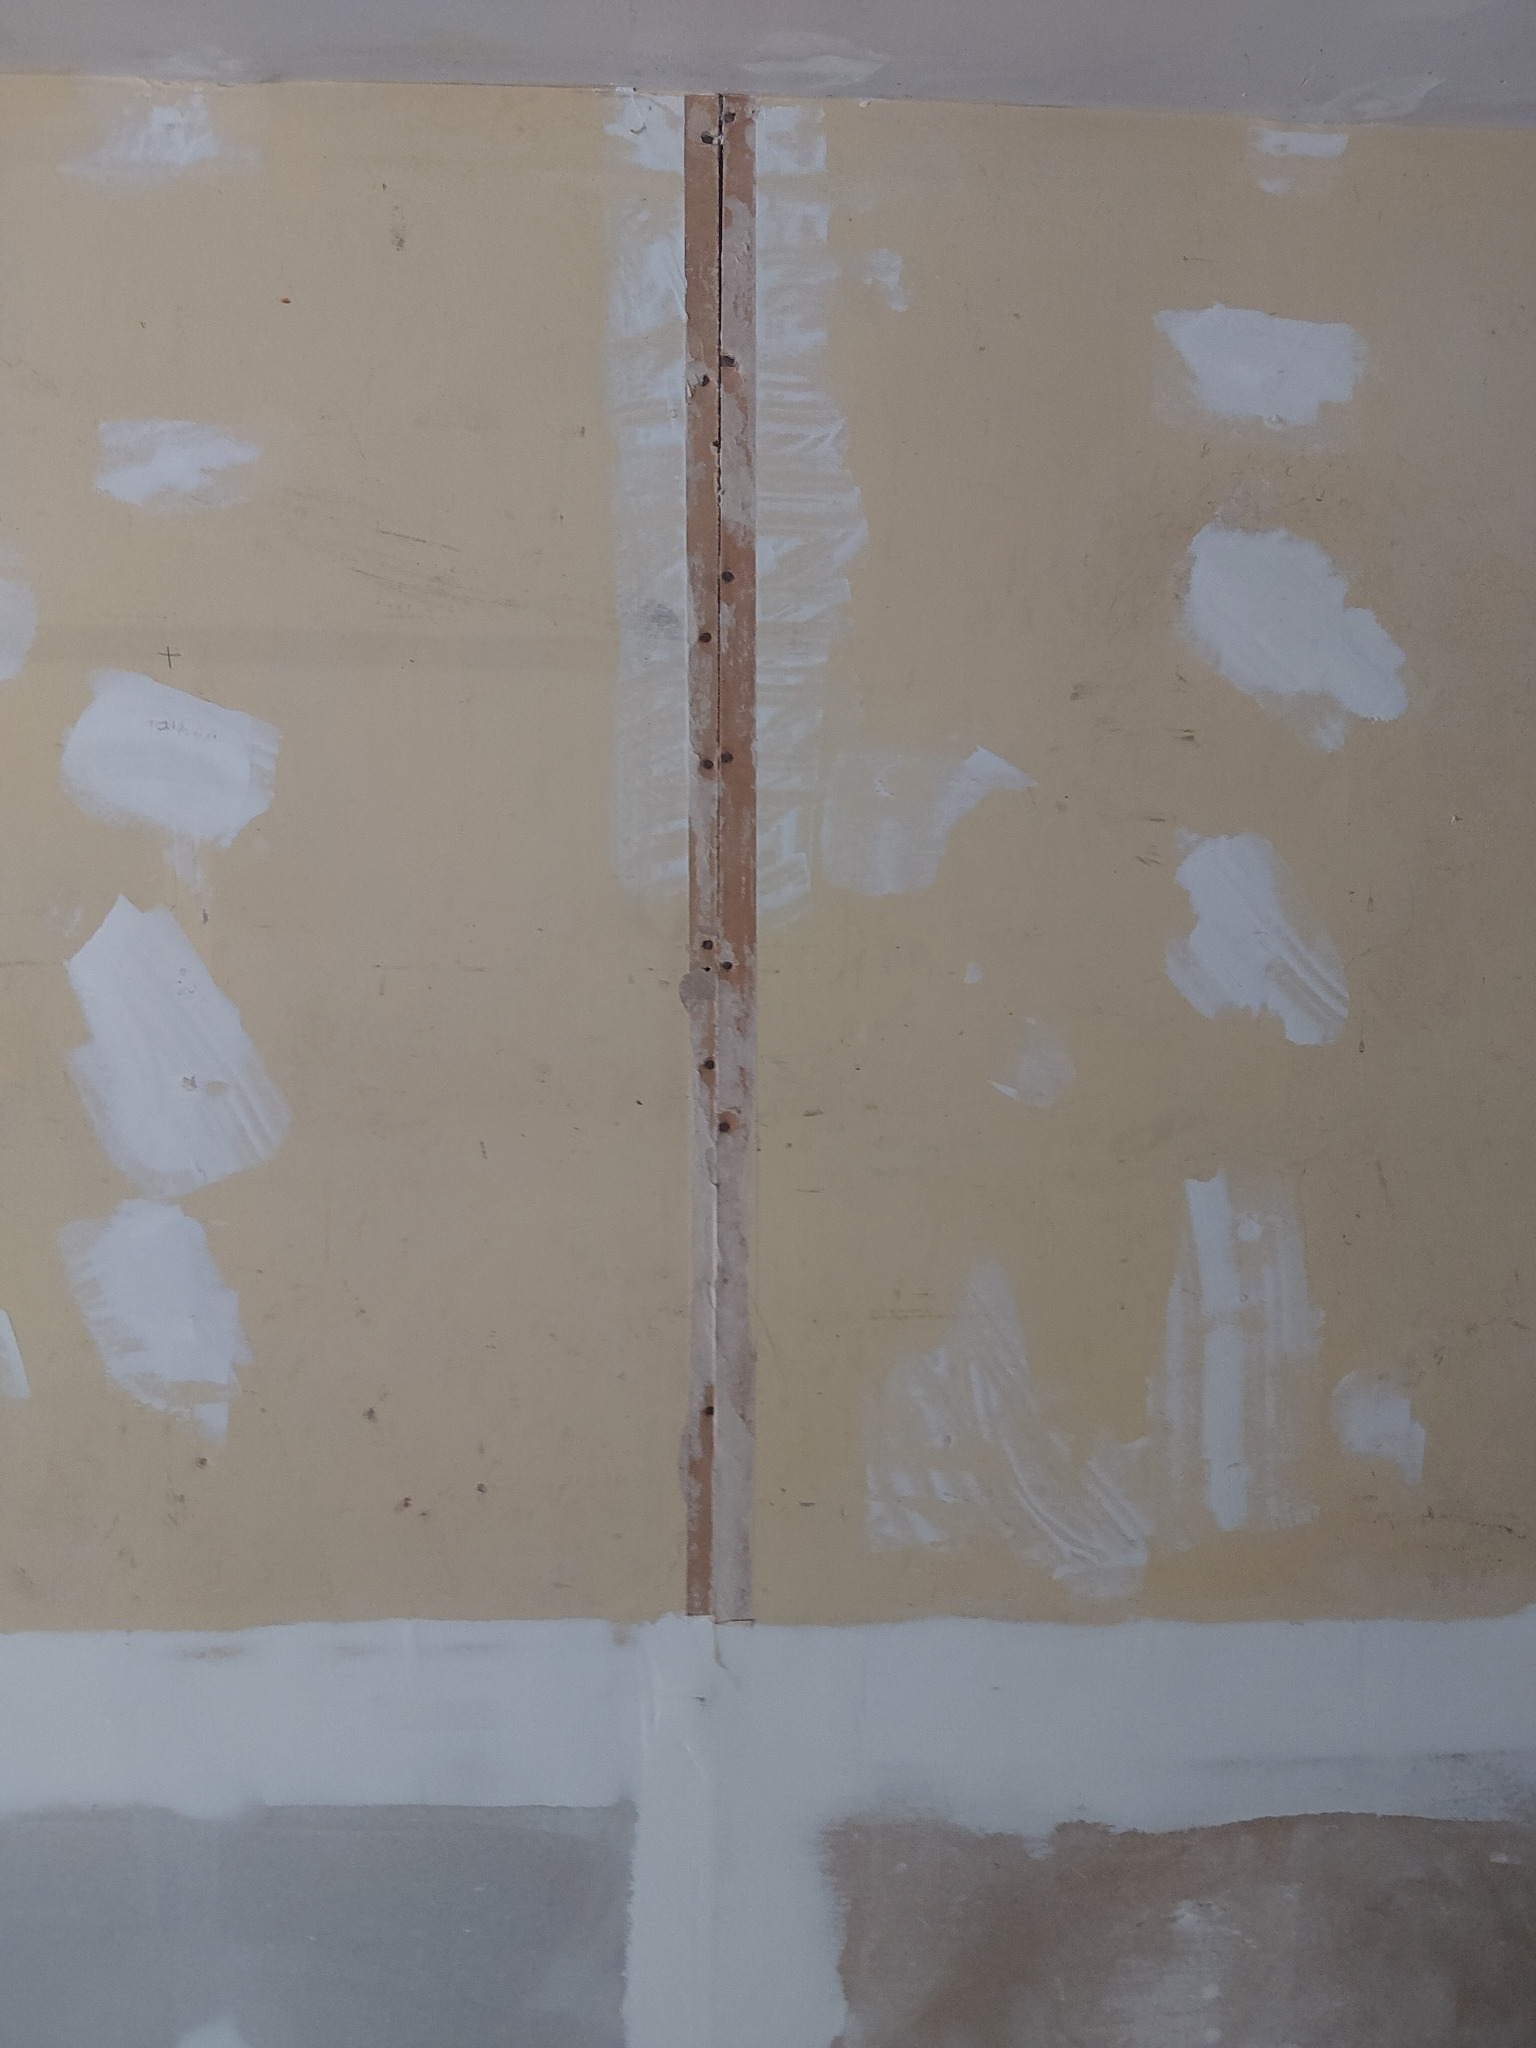
Exposed joint seam Loose and unstable material was removed so the drywall joint and board edges could be reinforced correctly.
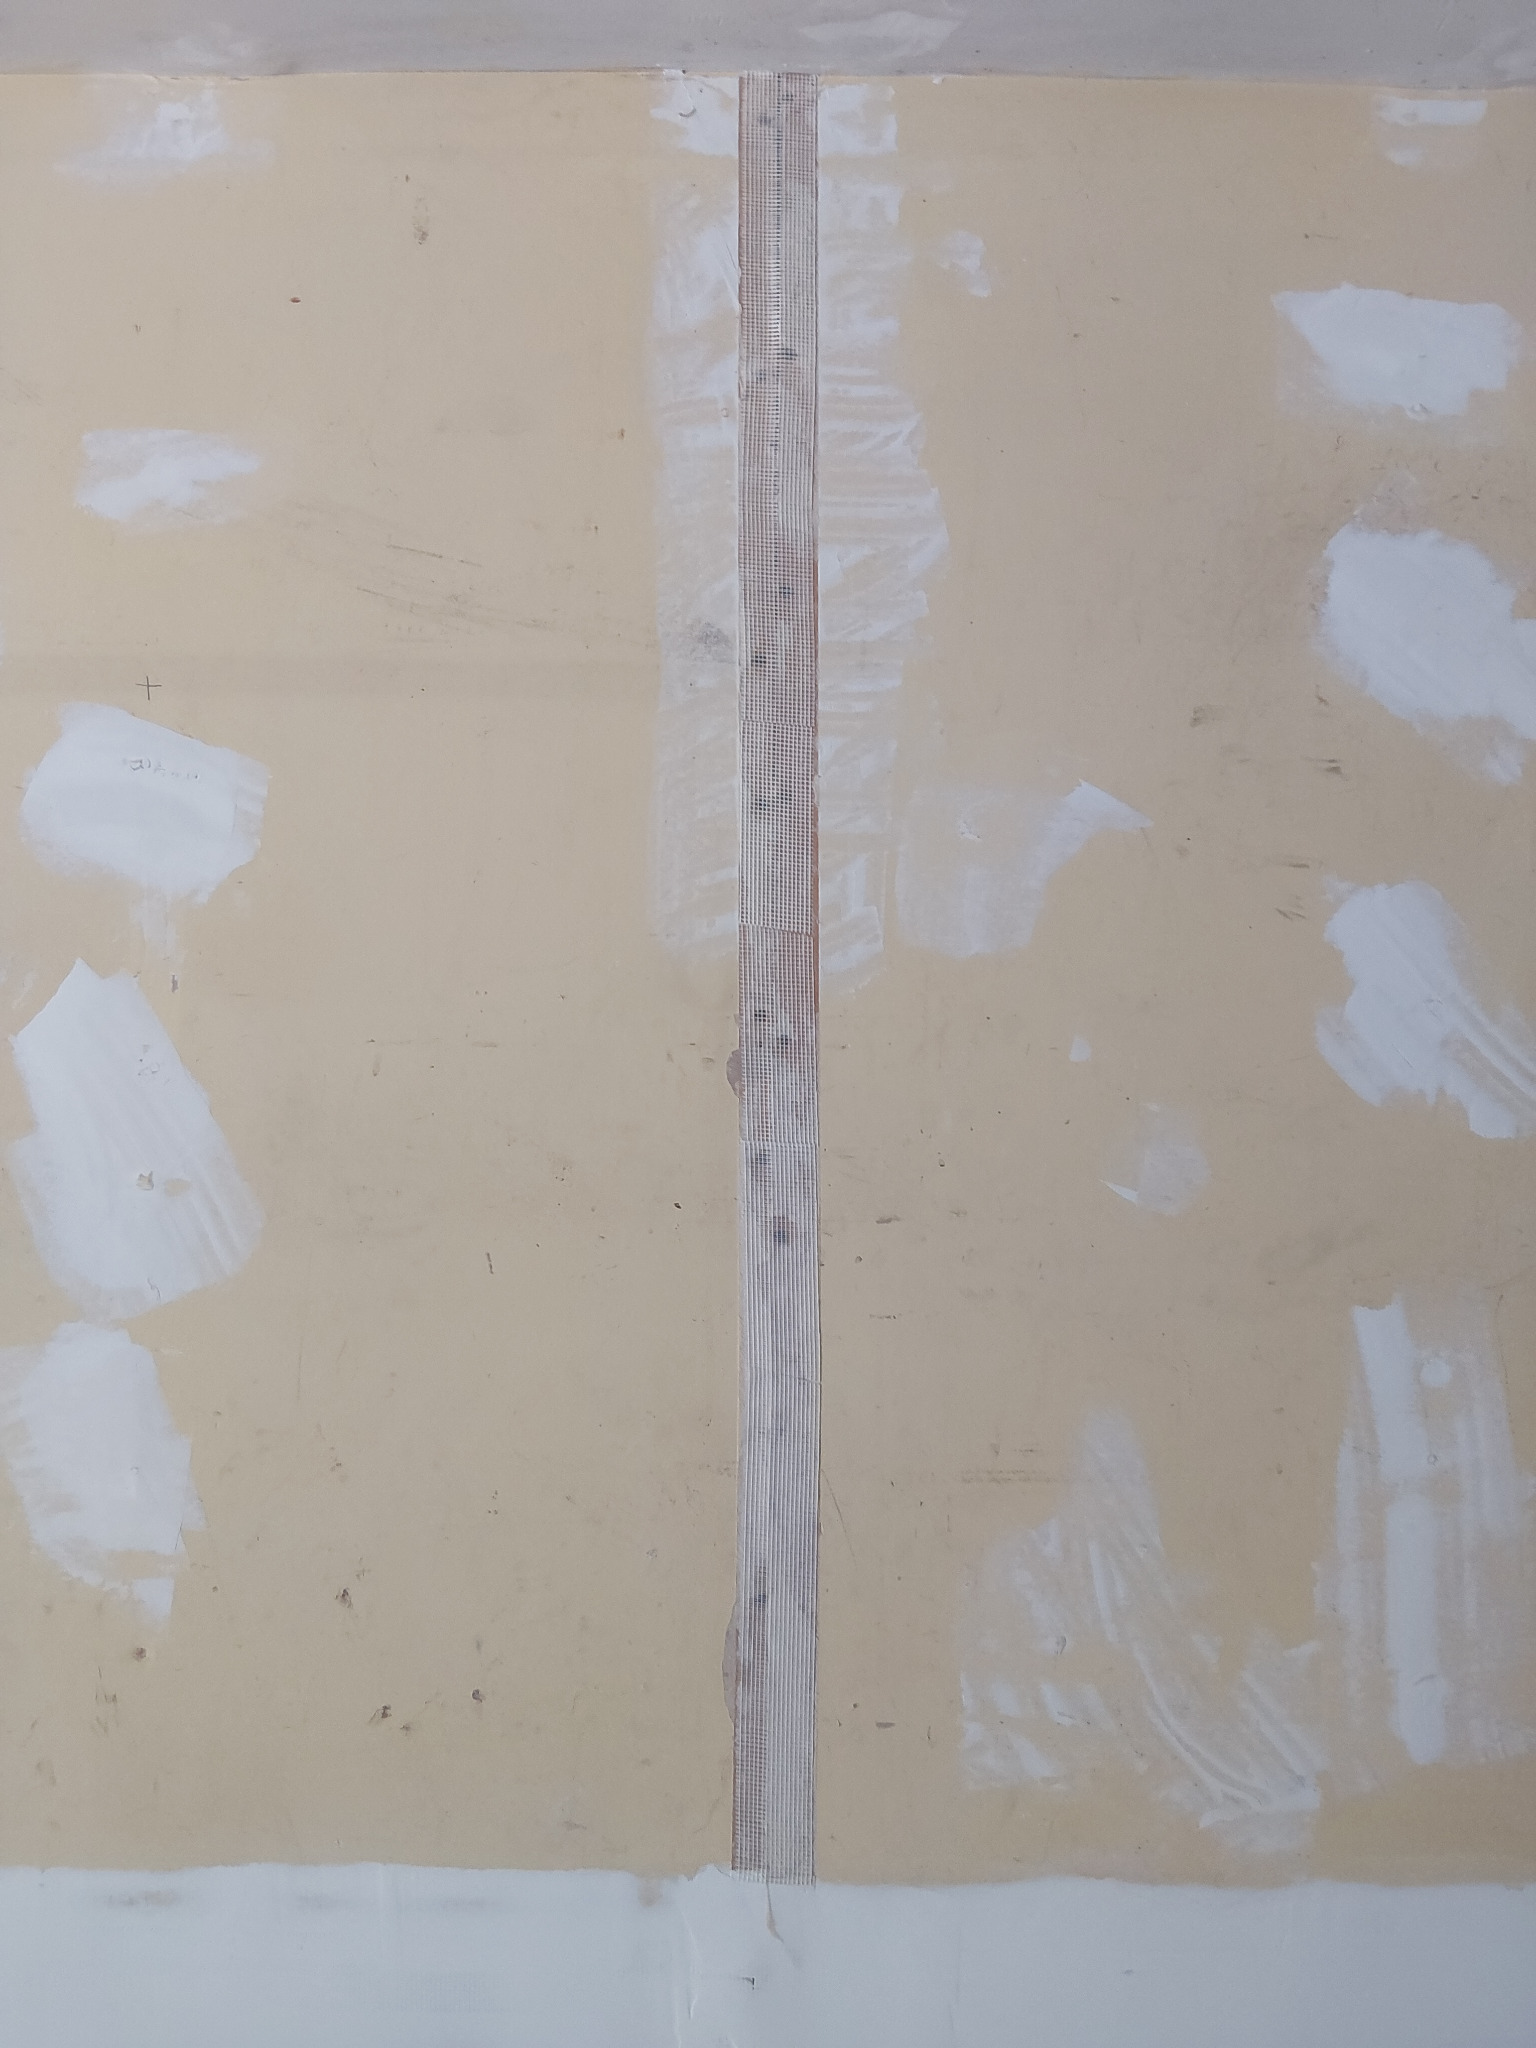
Fiberglass mesh tape applied Reinforcing mesh tape was centered over the full joint to bridge the two drywall edges.
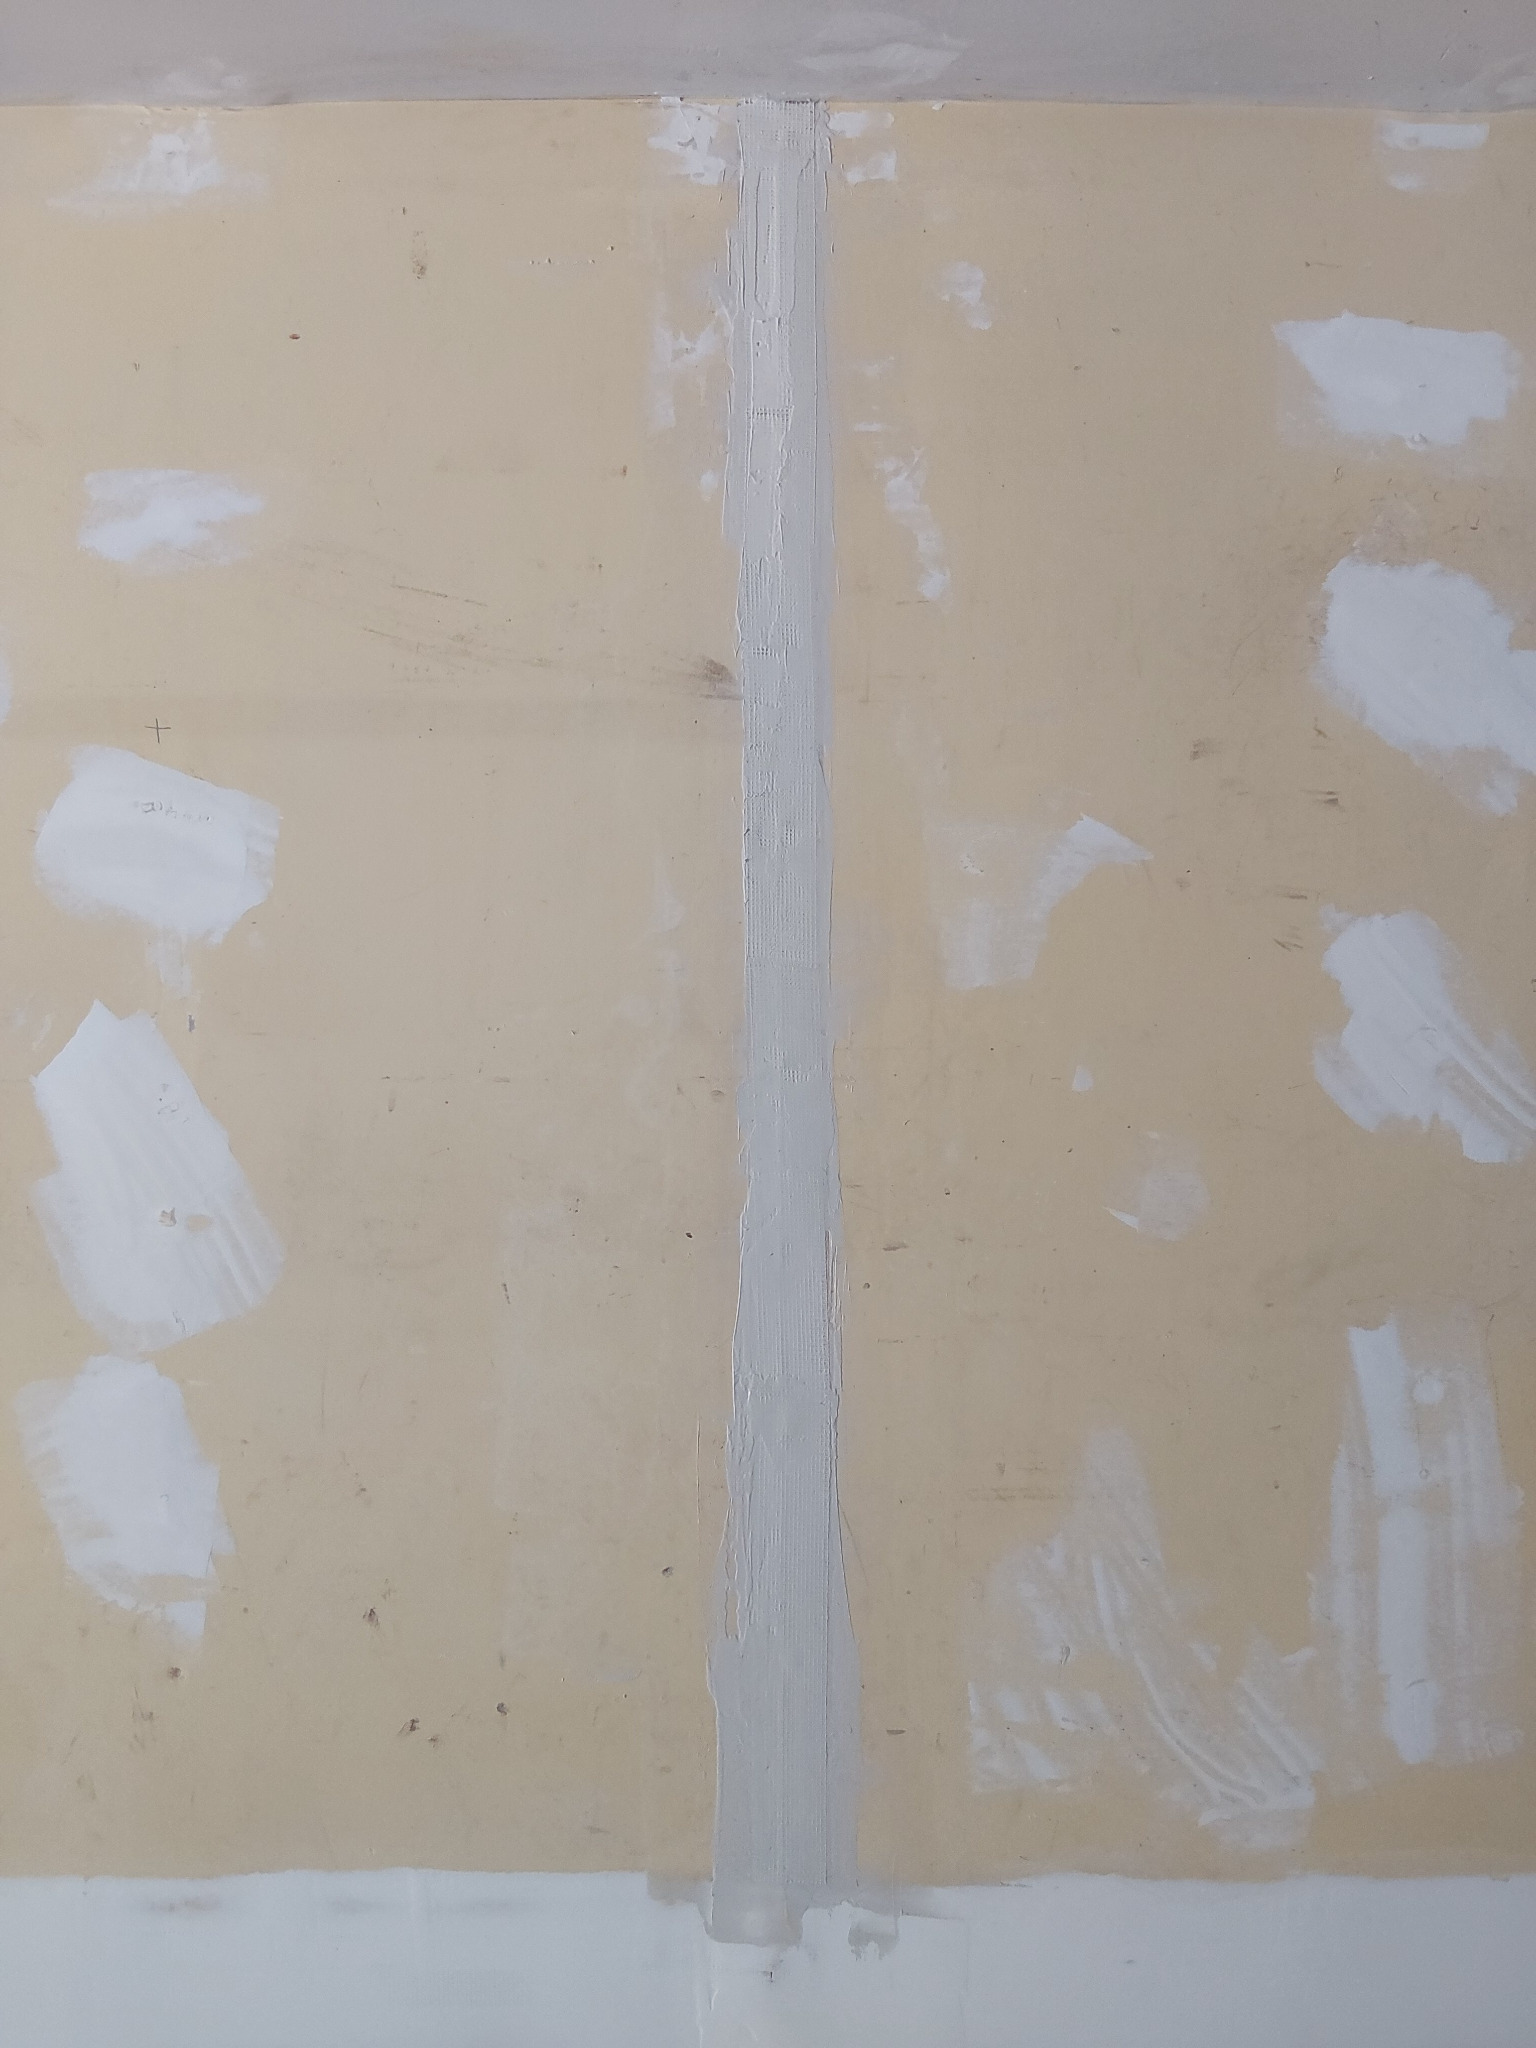
Initial joint compound applied Setting-type compound was worked through and over the mesh to fill, bond, and stabilize the seam.
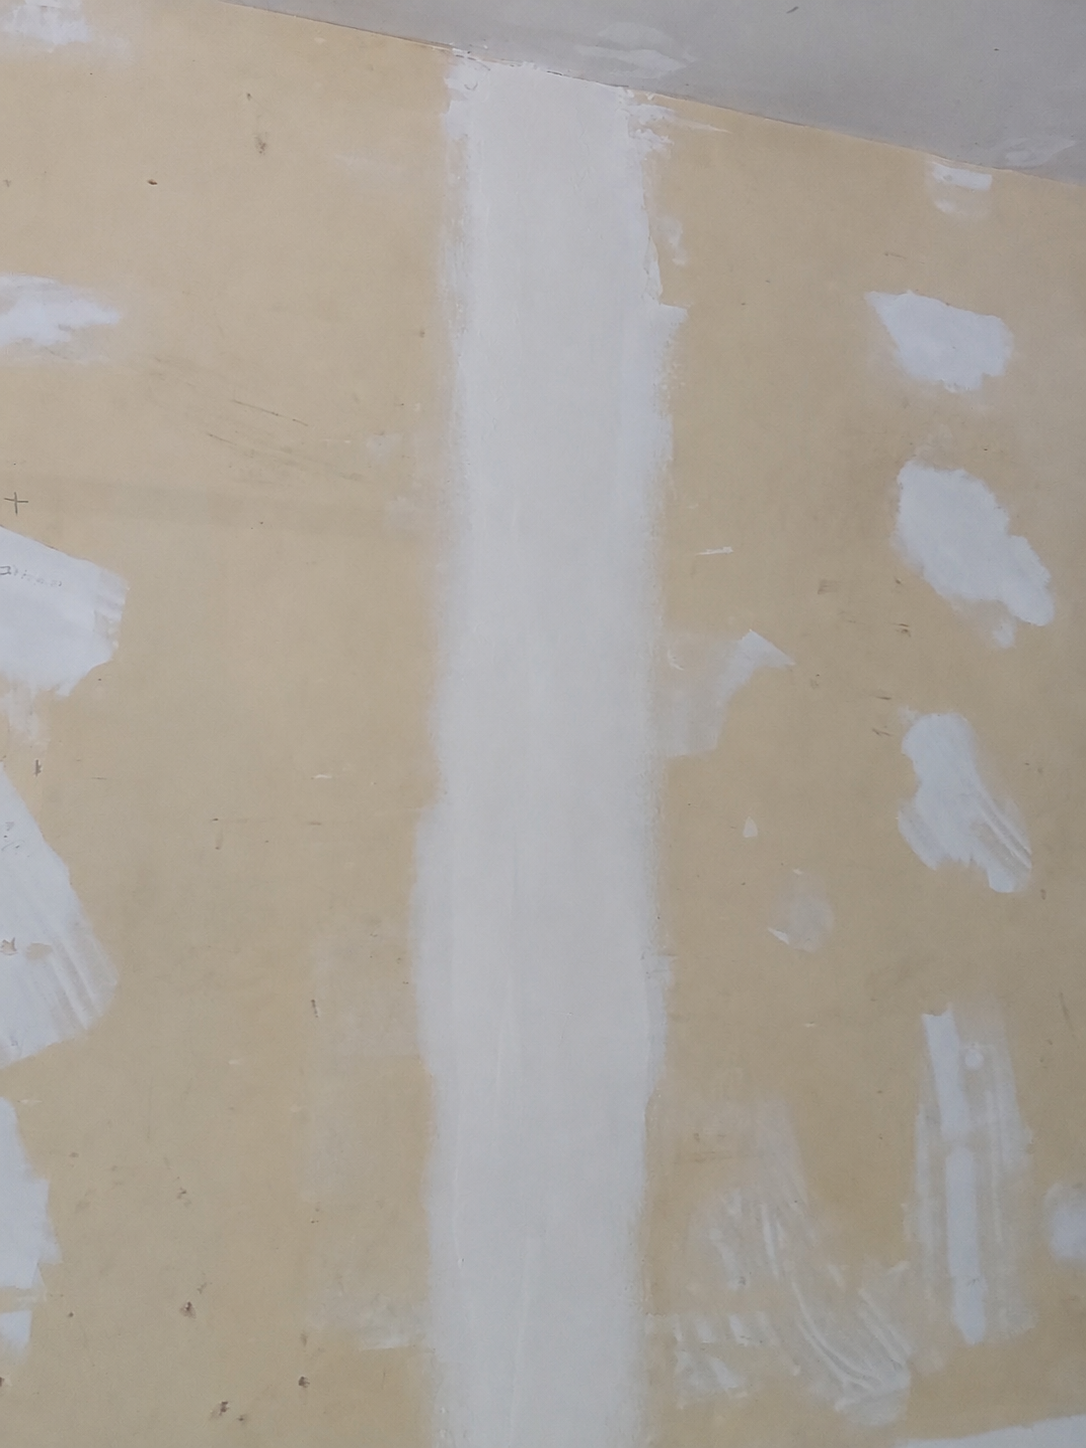
Finishing compound widened and feathered A wider finishing coat was applied beyond the original joint and feathered into the surrounding wall before final sanding.
Repairing Loose or Failing Drywall Tape
Loose drywall tape should not simply be covered with another layer of joint compound. Once tape has separated from the surface underneath it, adding compound over the failure may hide the defect temporarily without correcting the unstable seam.
In this garage ceiling, one specific strip of tape had begun to release above the garage-door opening. The surrounding tape remained secure and did not require removal. Rather than disturbing sound material or coating the entire ceiling unnecessarily, we removed the complete failed strip, cleaned and reinforced the affected seam, applied new reinforcing tape with setting-type joint compound, and then widened, feathered, and sanded the repair.
This is a targeted drywall repair. Stable tape and surrounding surfaces remain in place. Failed tape is removed and rebuilt because loose tape is still loose tape, even when the failure is limited to one seam.
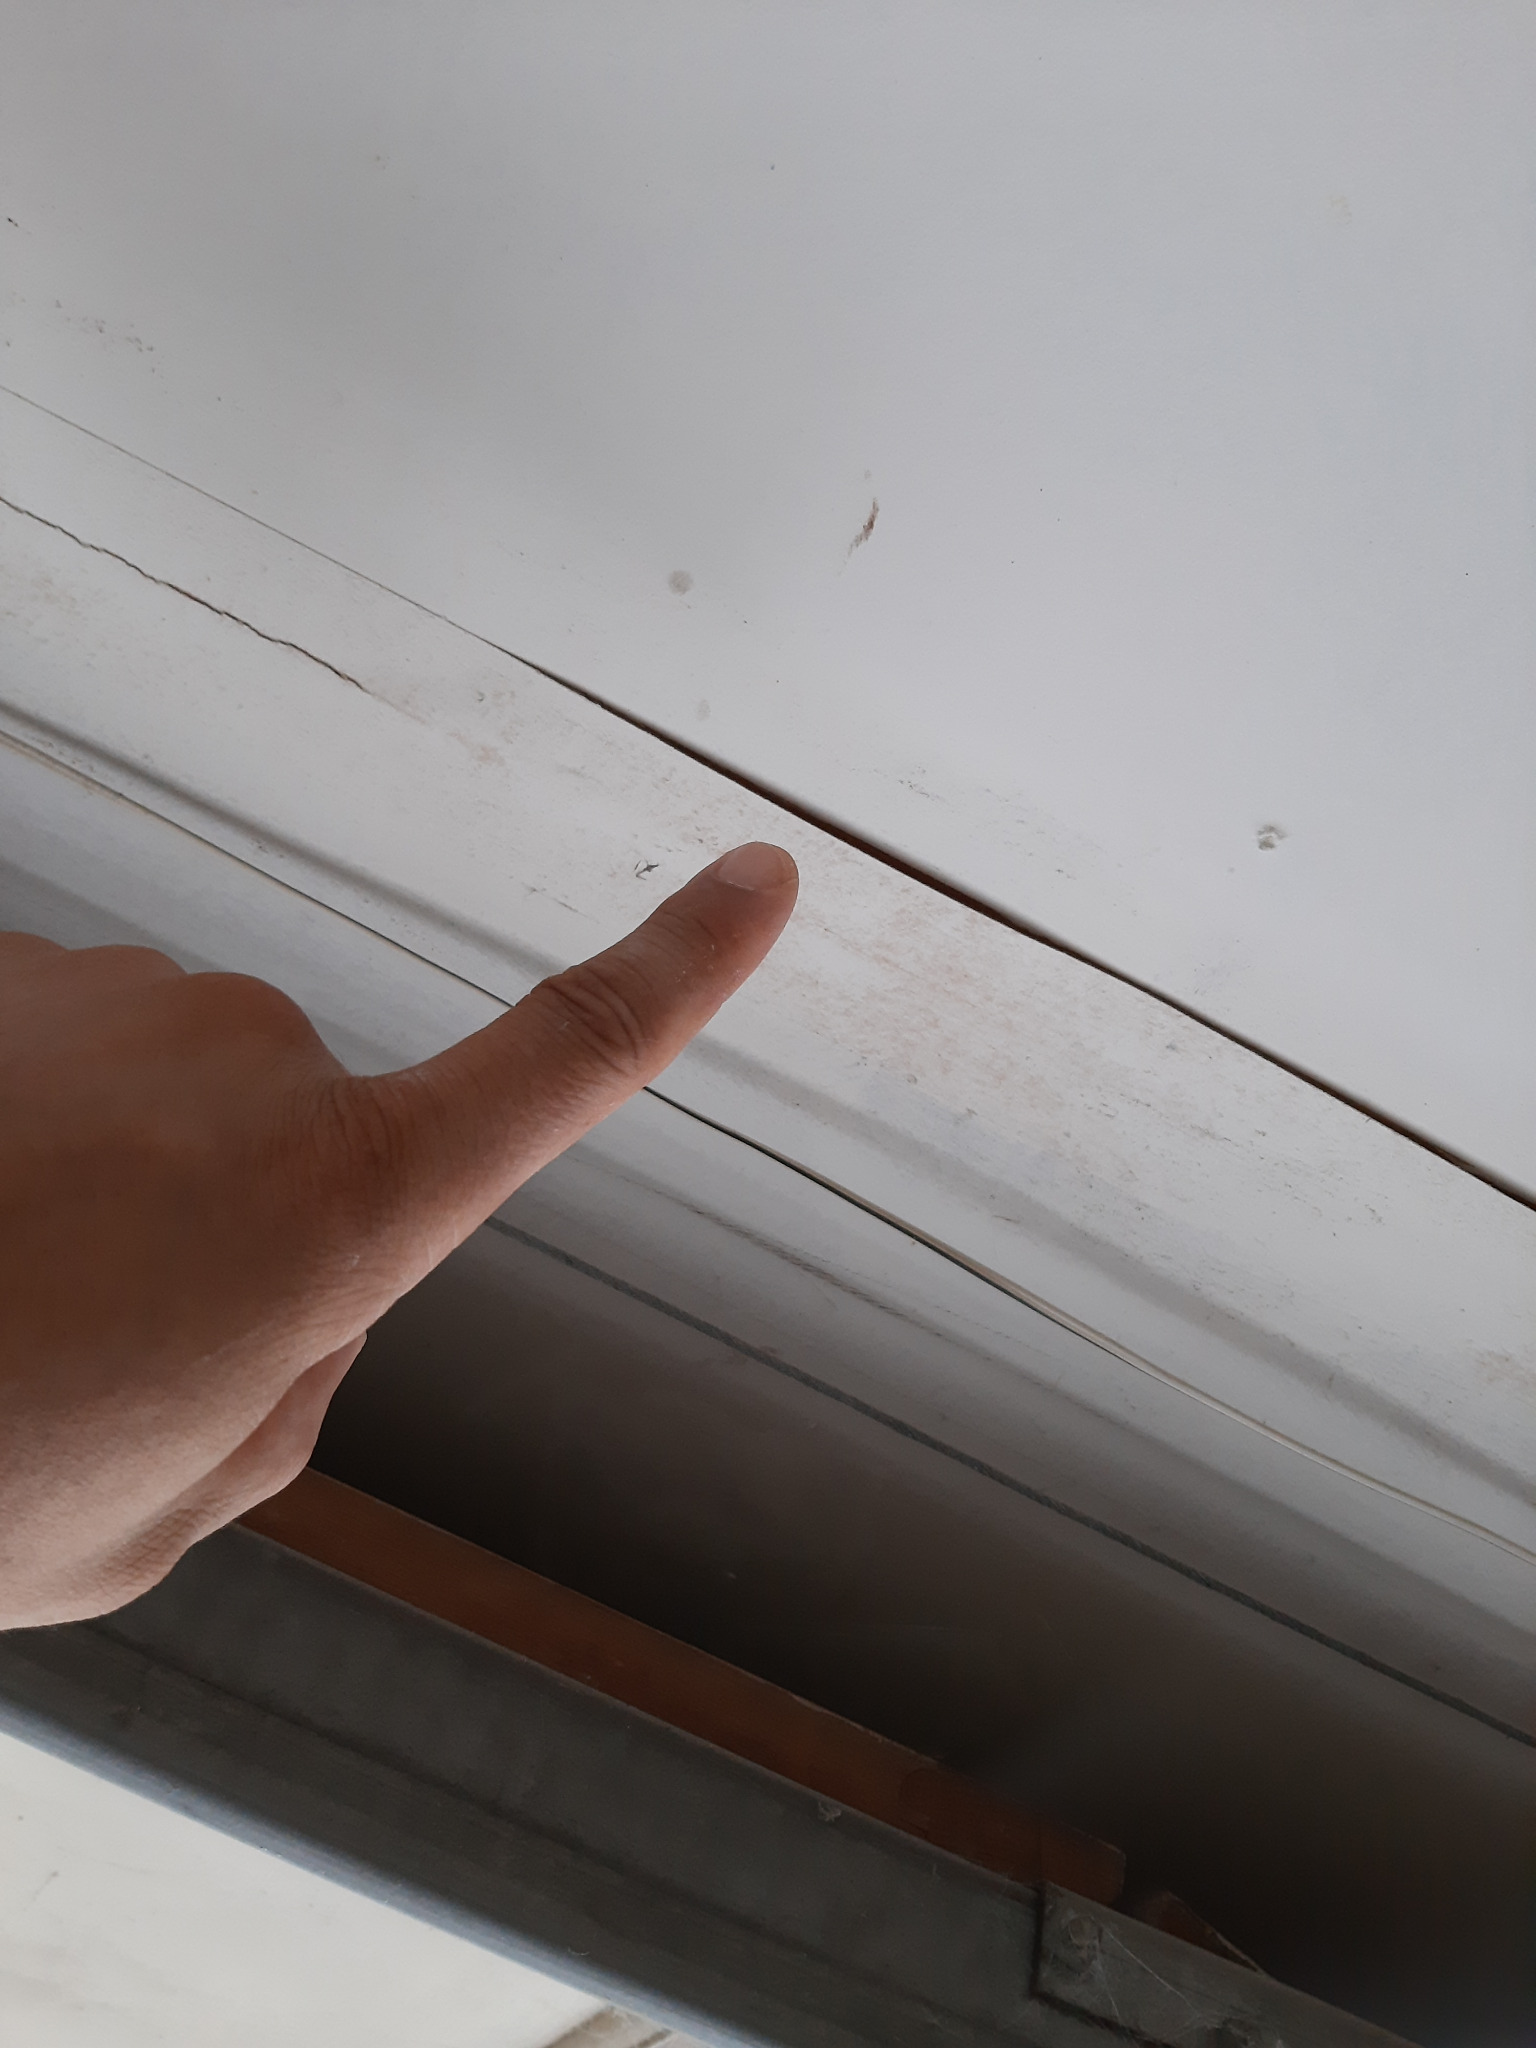
Loose tape identified A separated drywall tape seam was identified above the garage-door opening.
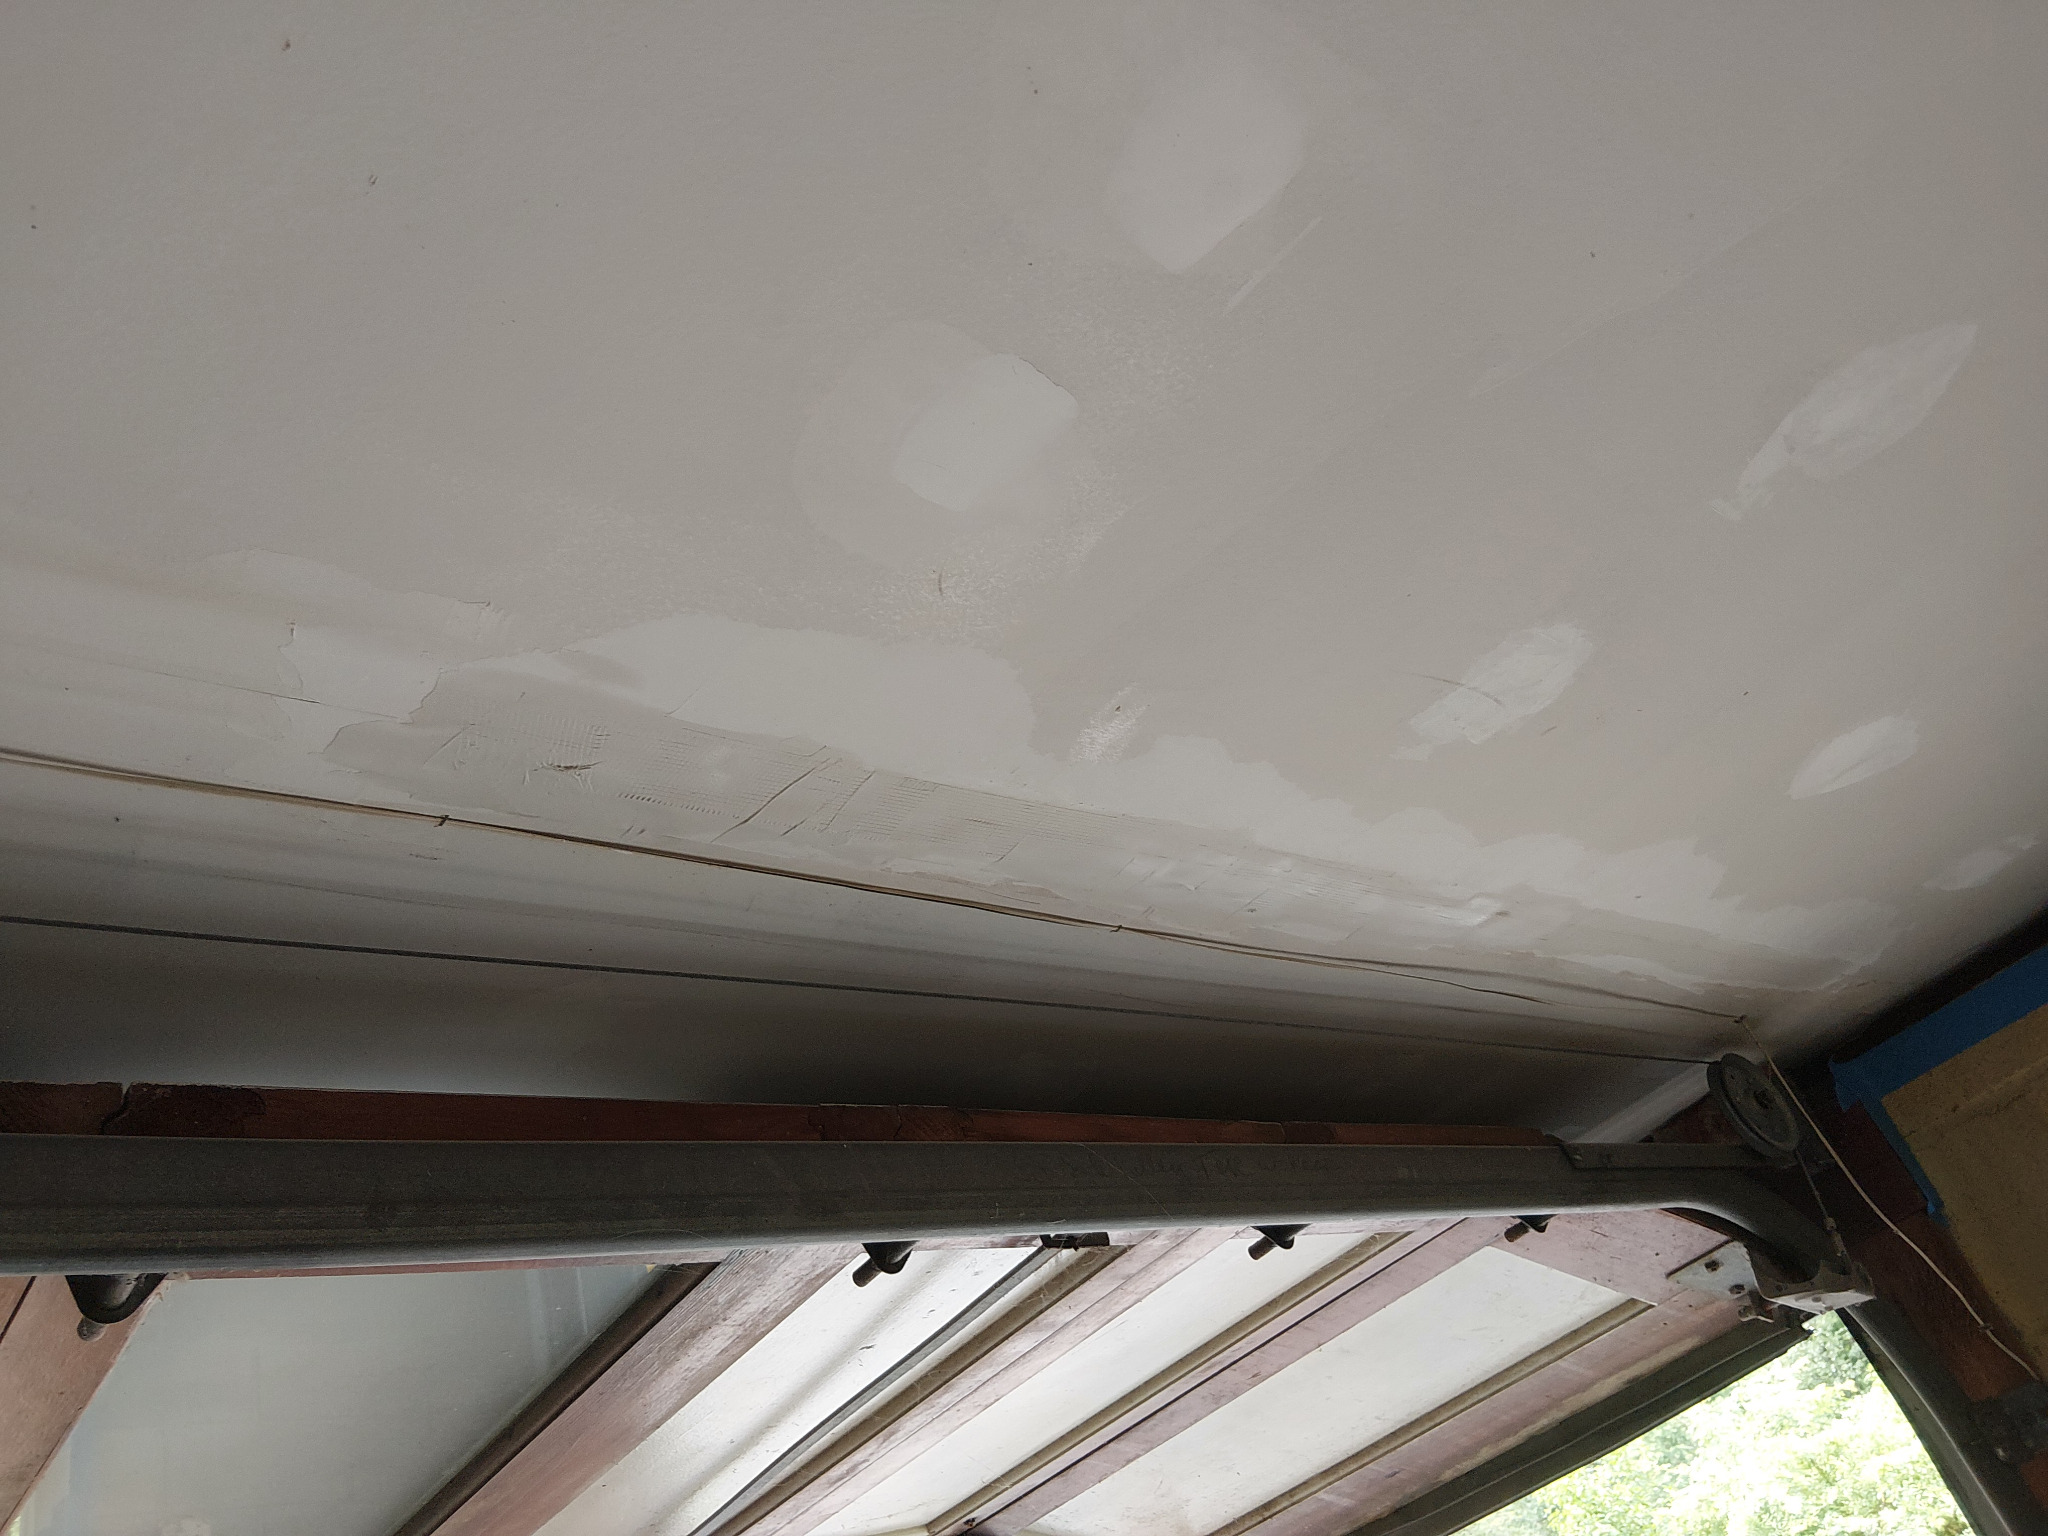
Failed tape removed and seam reinforced The complete failed strip was removed and replaced with reinforcing mesh tape and setting-type joint compound.
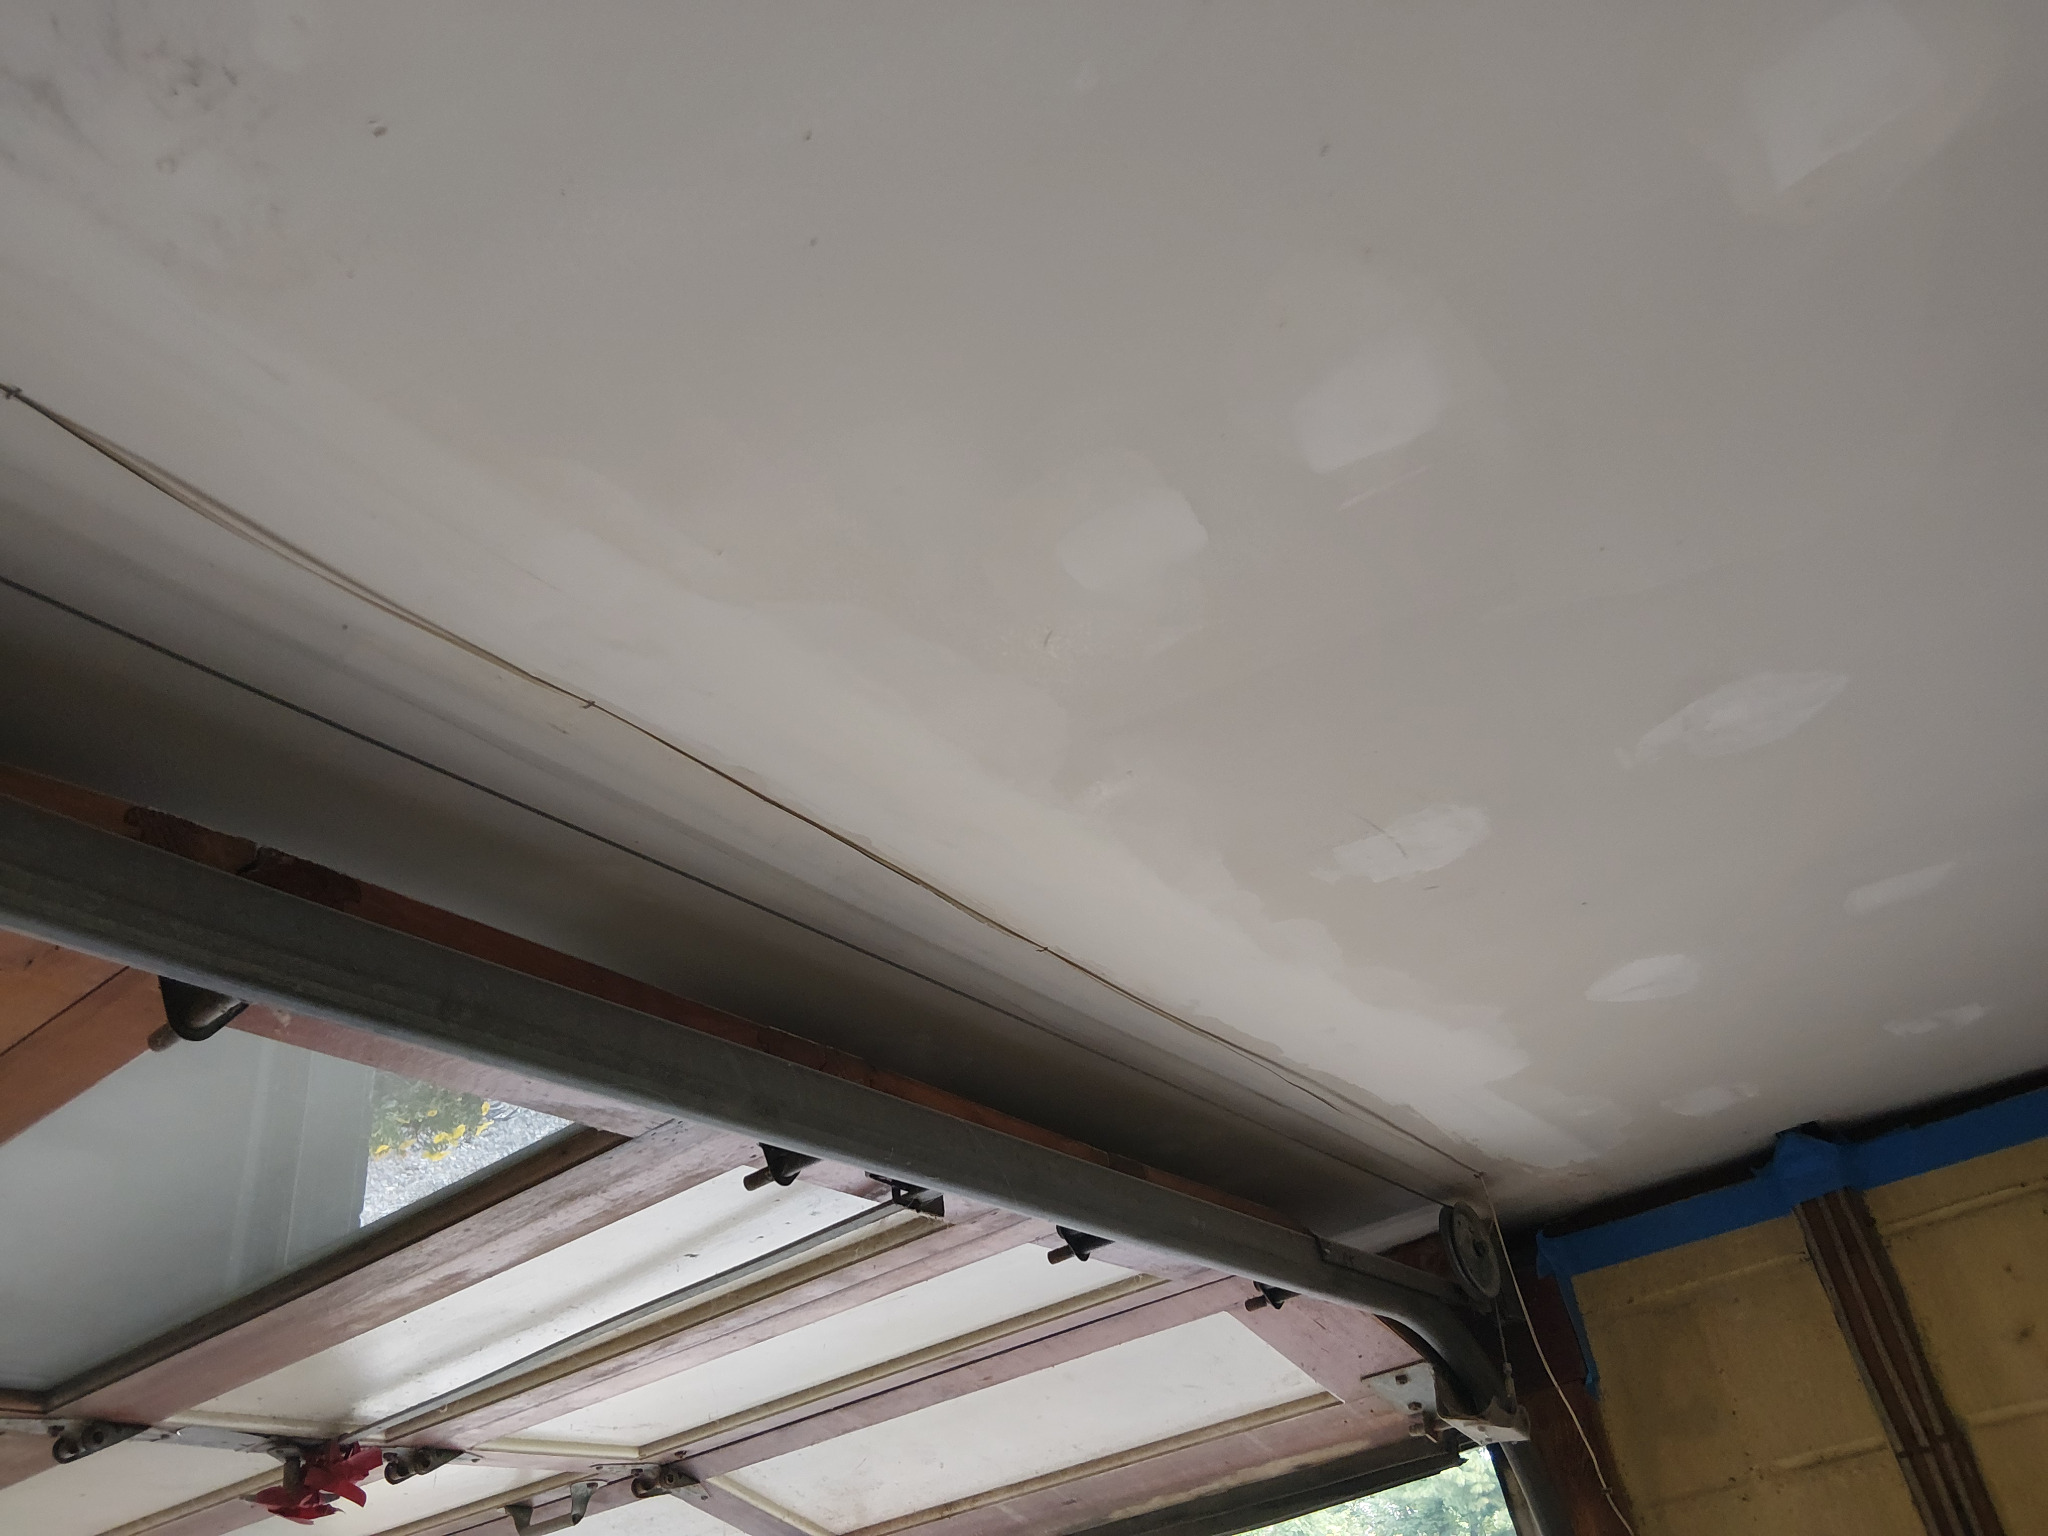
Repair compounded, feathered, and sanded The rebuilt seam was coated, widened, feathered, and sanded in preparation for primer and paint.
Removing Bubbling Ceiling Tape and Rebuilding the Seam
Bubbling drywall tape is a sign that the tape has released from the surface underneath it. Once the tape has separated, covering the raised area with more compound does not correct the failed bond and can leave the same defect visible beneath the new work.
In this ceiling repair, the bubbling tape was first identified along the affected joint. The failed strip and loose surrounding material were then removed so the seam could be reached directly. The exposed joint was retaped and covered with joint compound, followed by wider compound work that was feathered and smoothed into the surrounding ceiling.
The removal stage can make the ceiling look rougher before it looks better. That is expected. Failed tape, loose compound, and unstable material must be taken out before a sound seam can be rebuilt. Stable tape and unaffected ceiling areas remain in place.
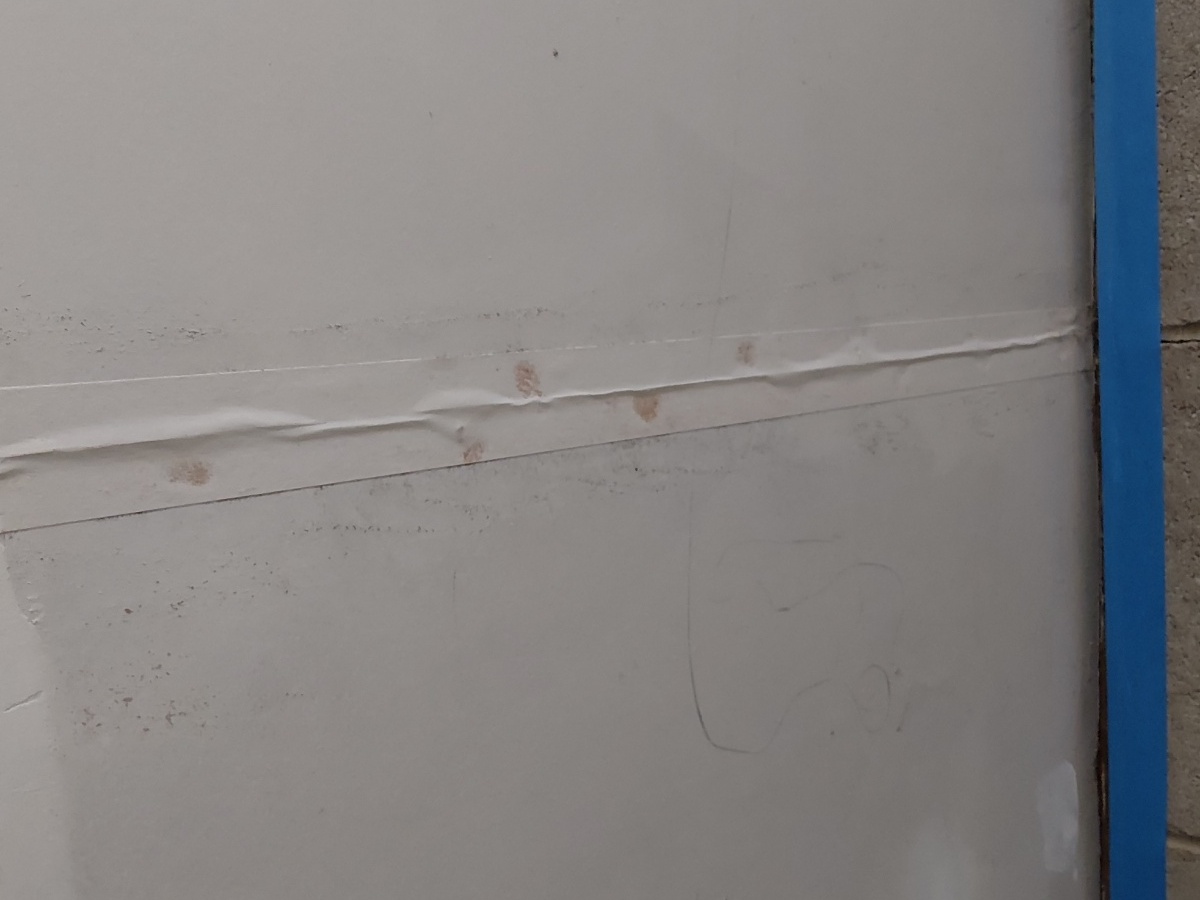
Bubbling tape identified The raised and wrinkled tape showed that the existing ceiling seam had released underneath.
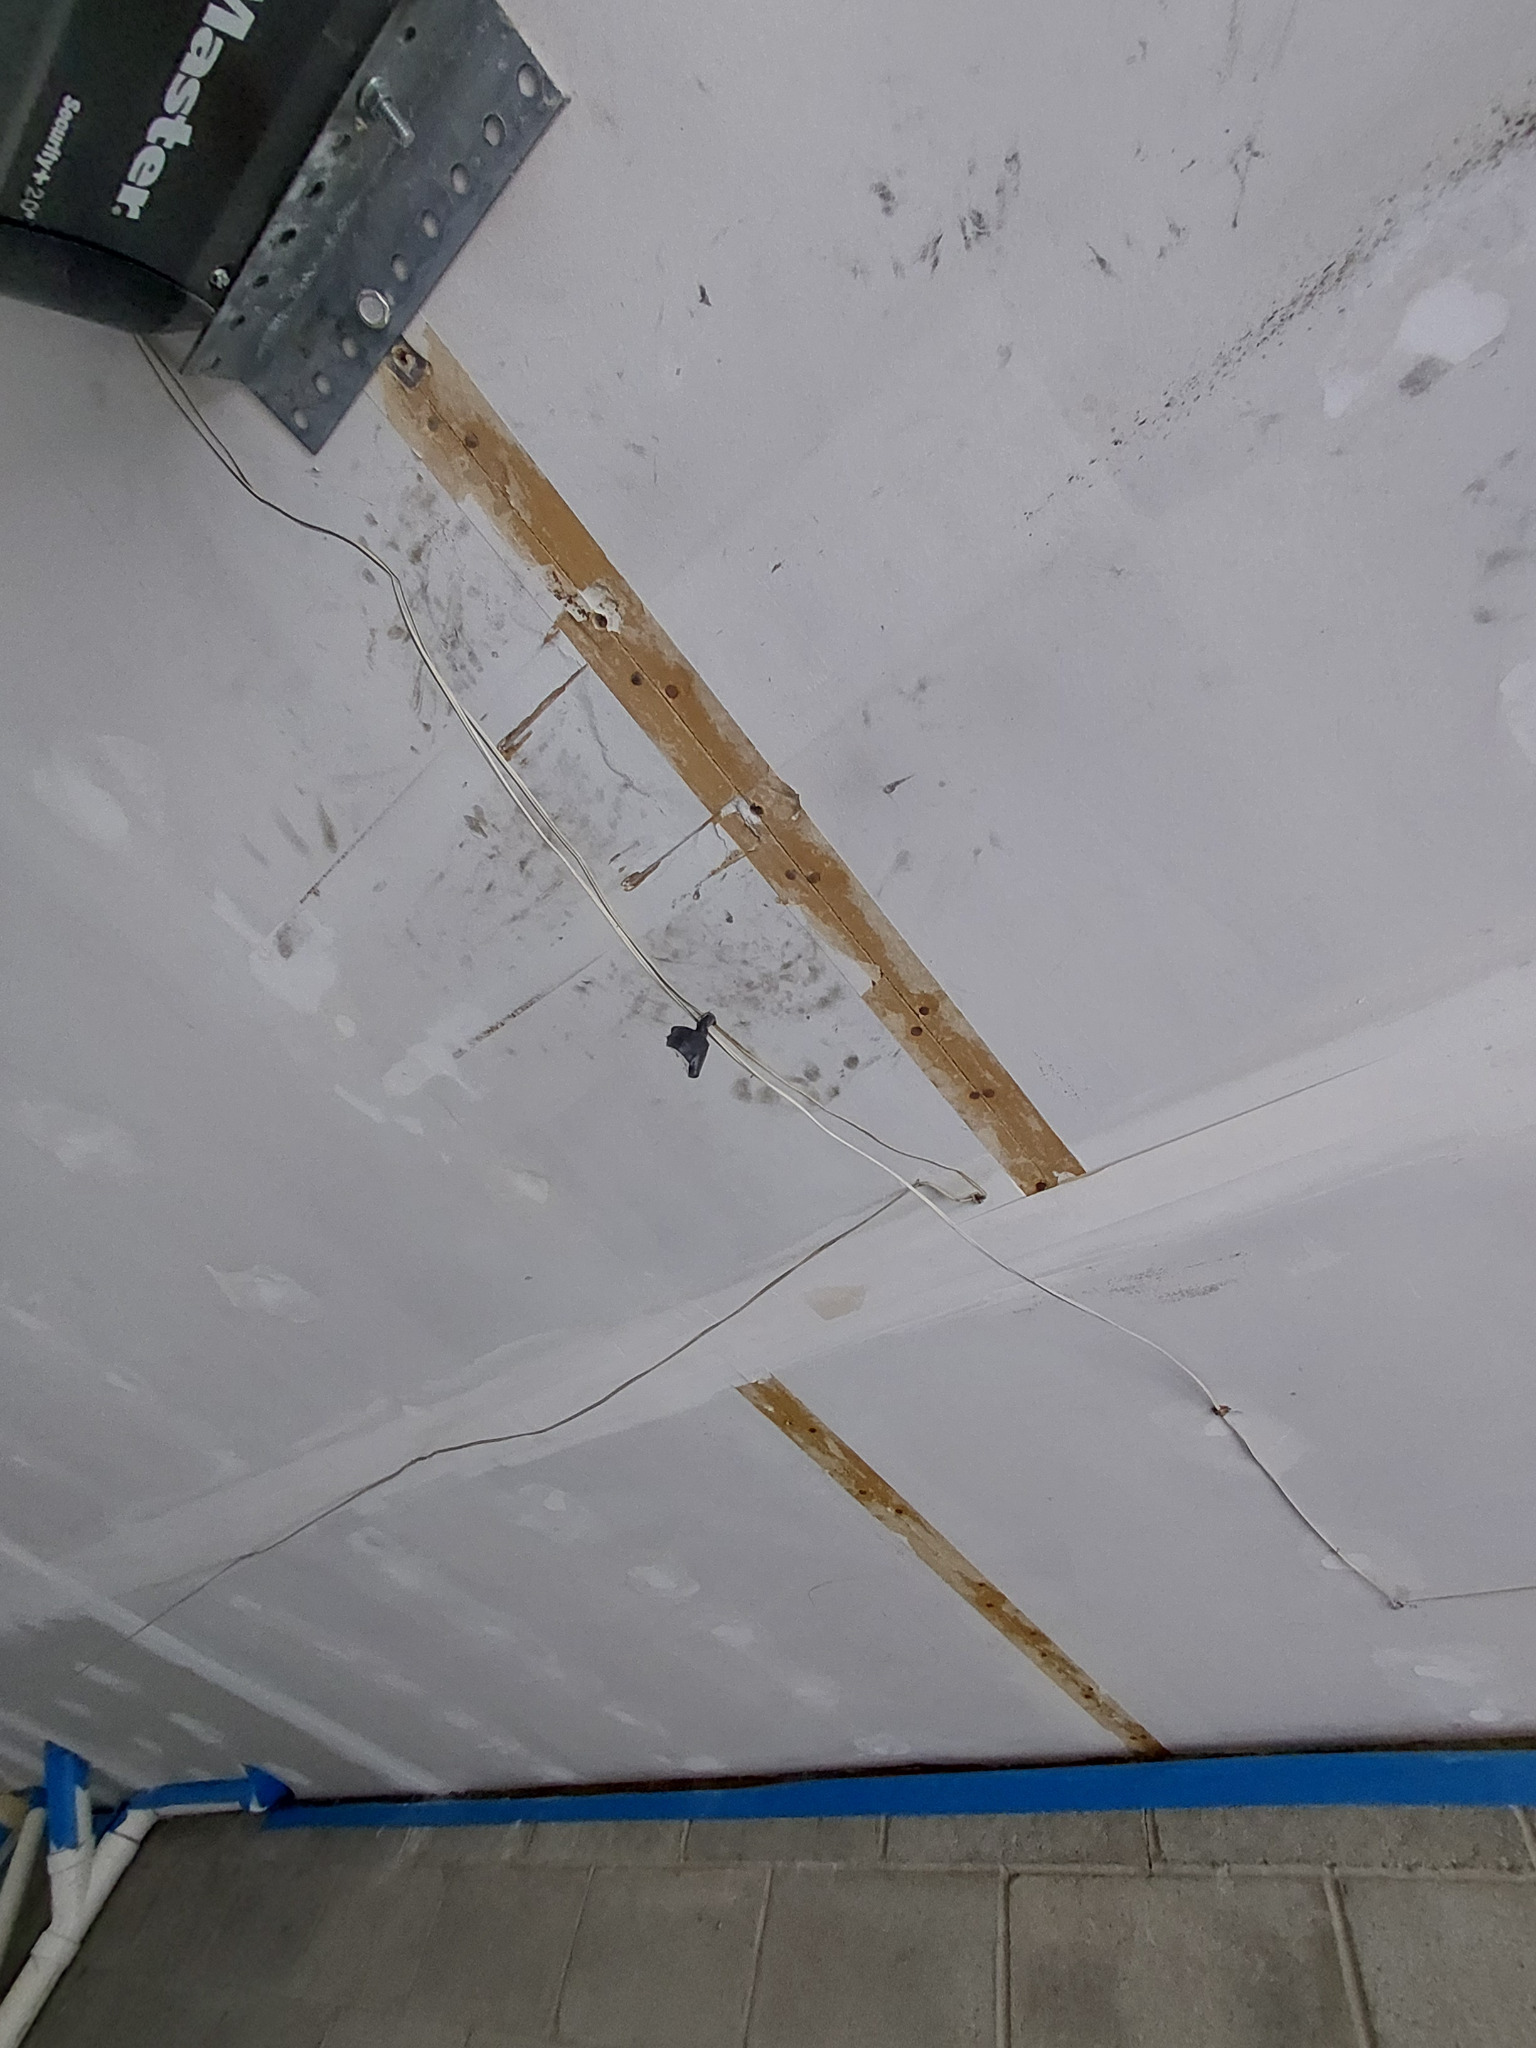
Failed tape removed The released tape and unstable compound were removed to expose the affected ceiling joints.
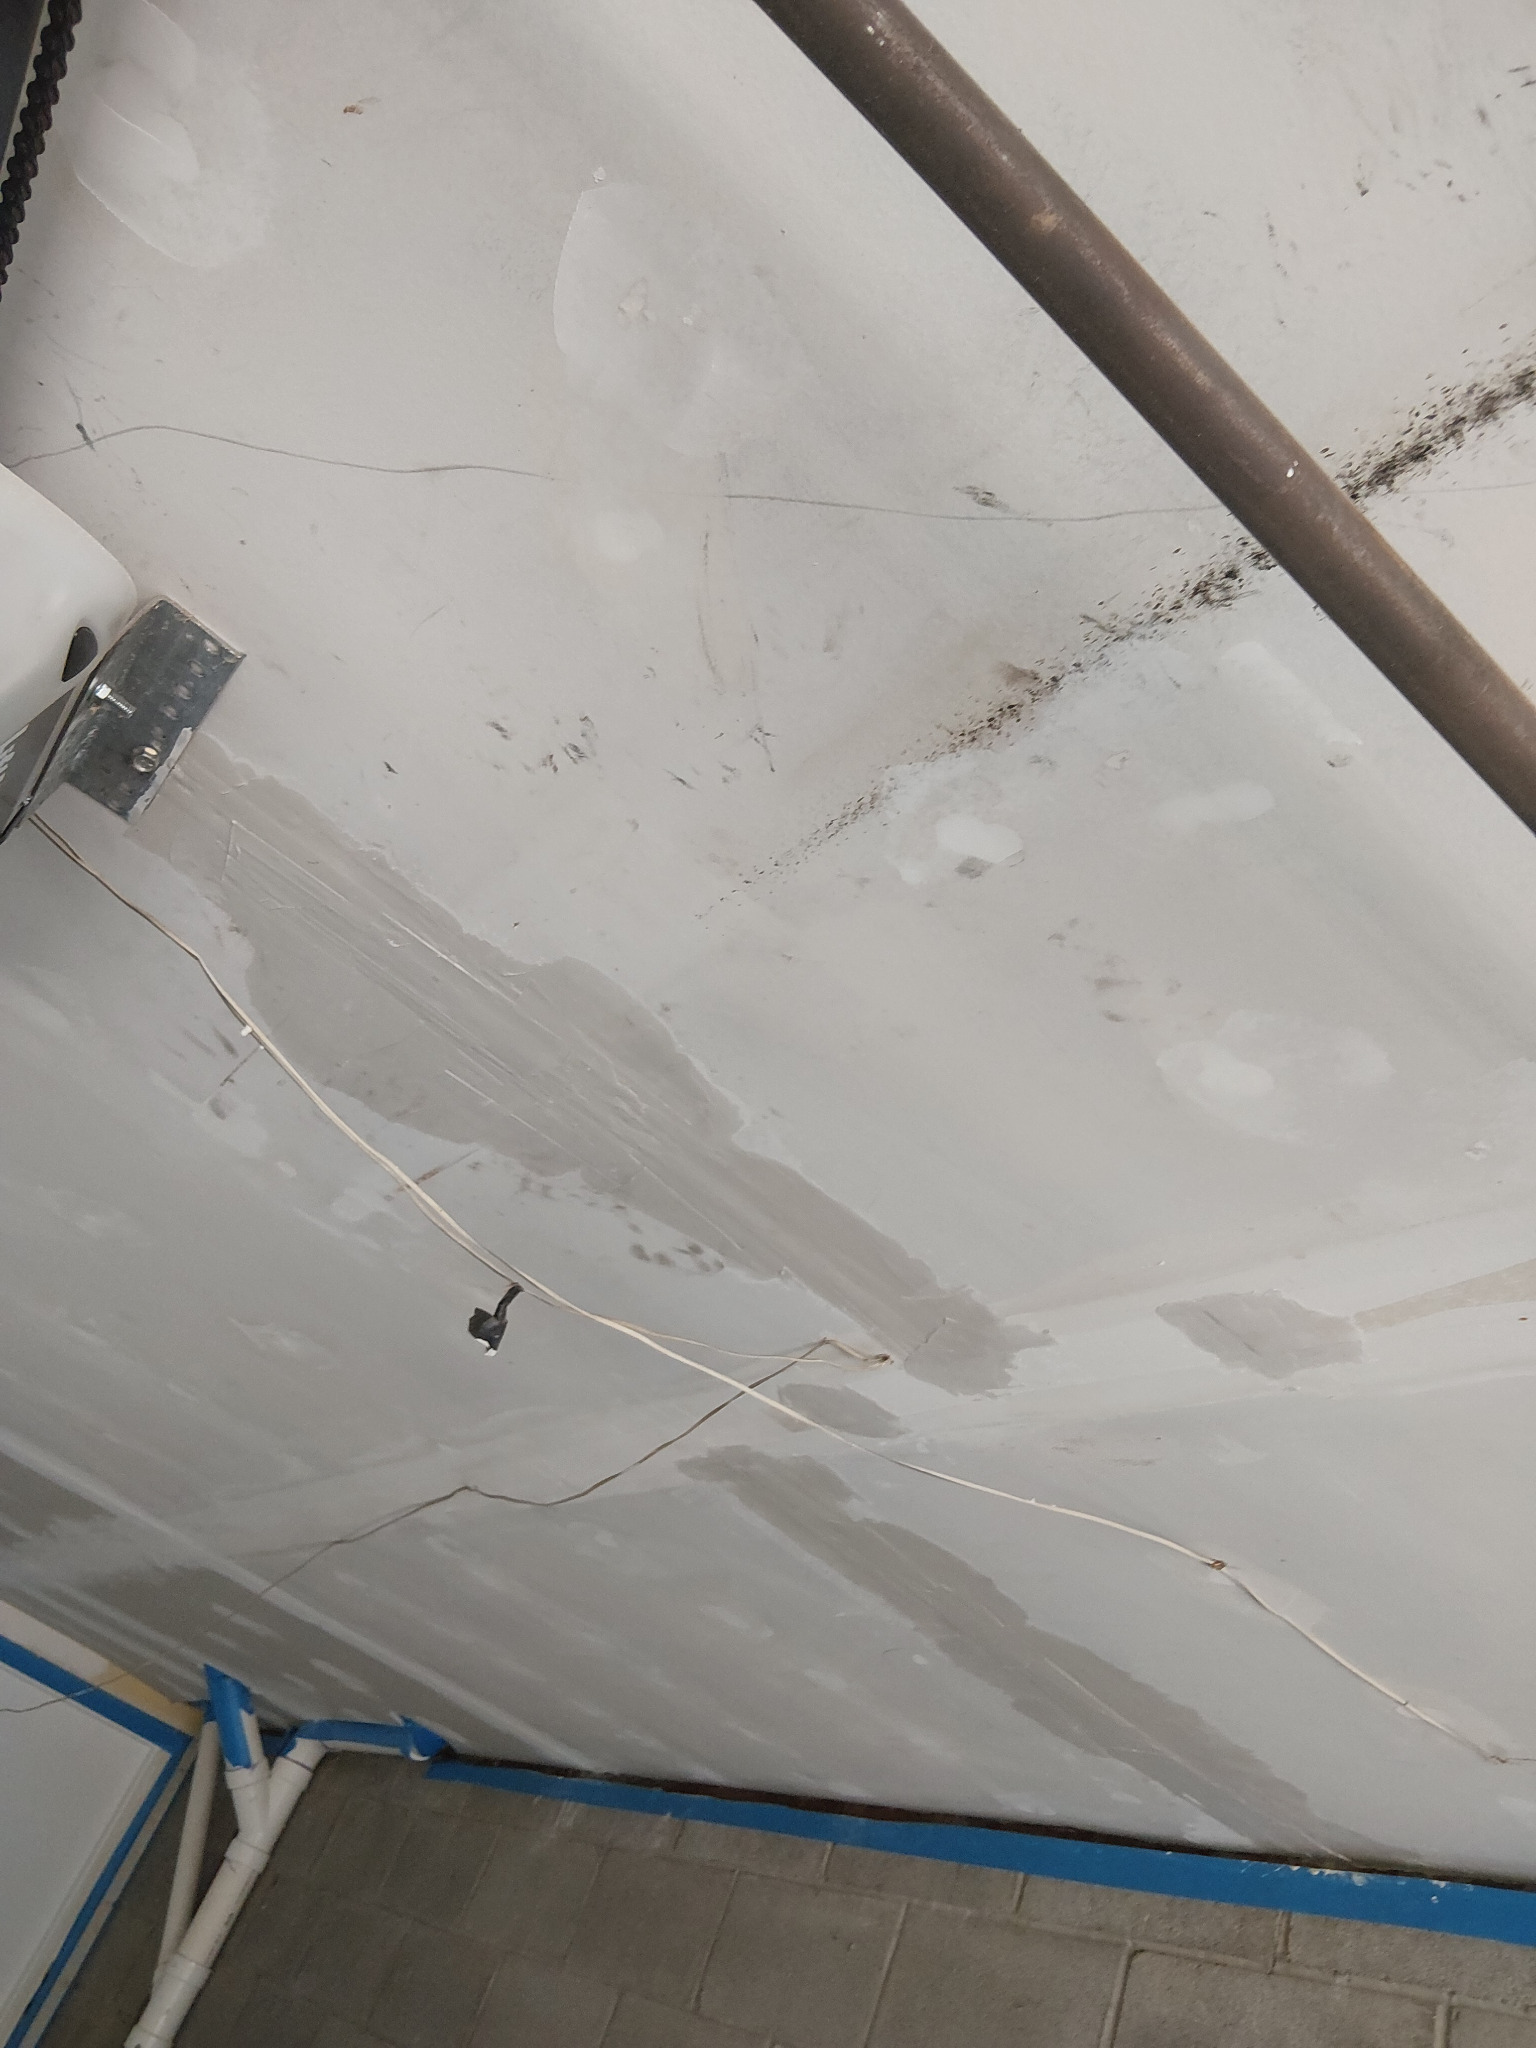
Seams retaped and compounded The exposed joints were reinforced again and covered with the initial compound applications.
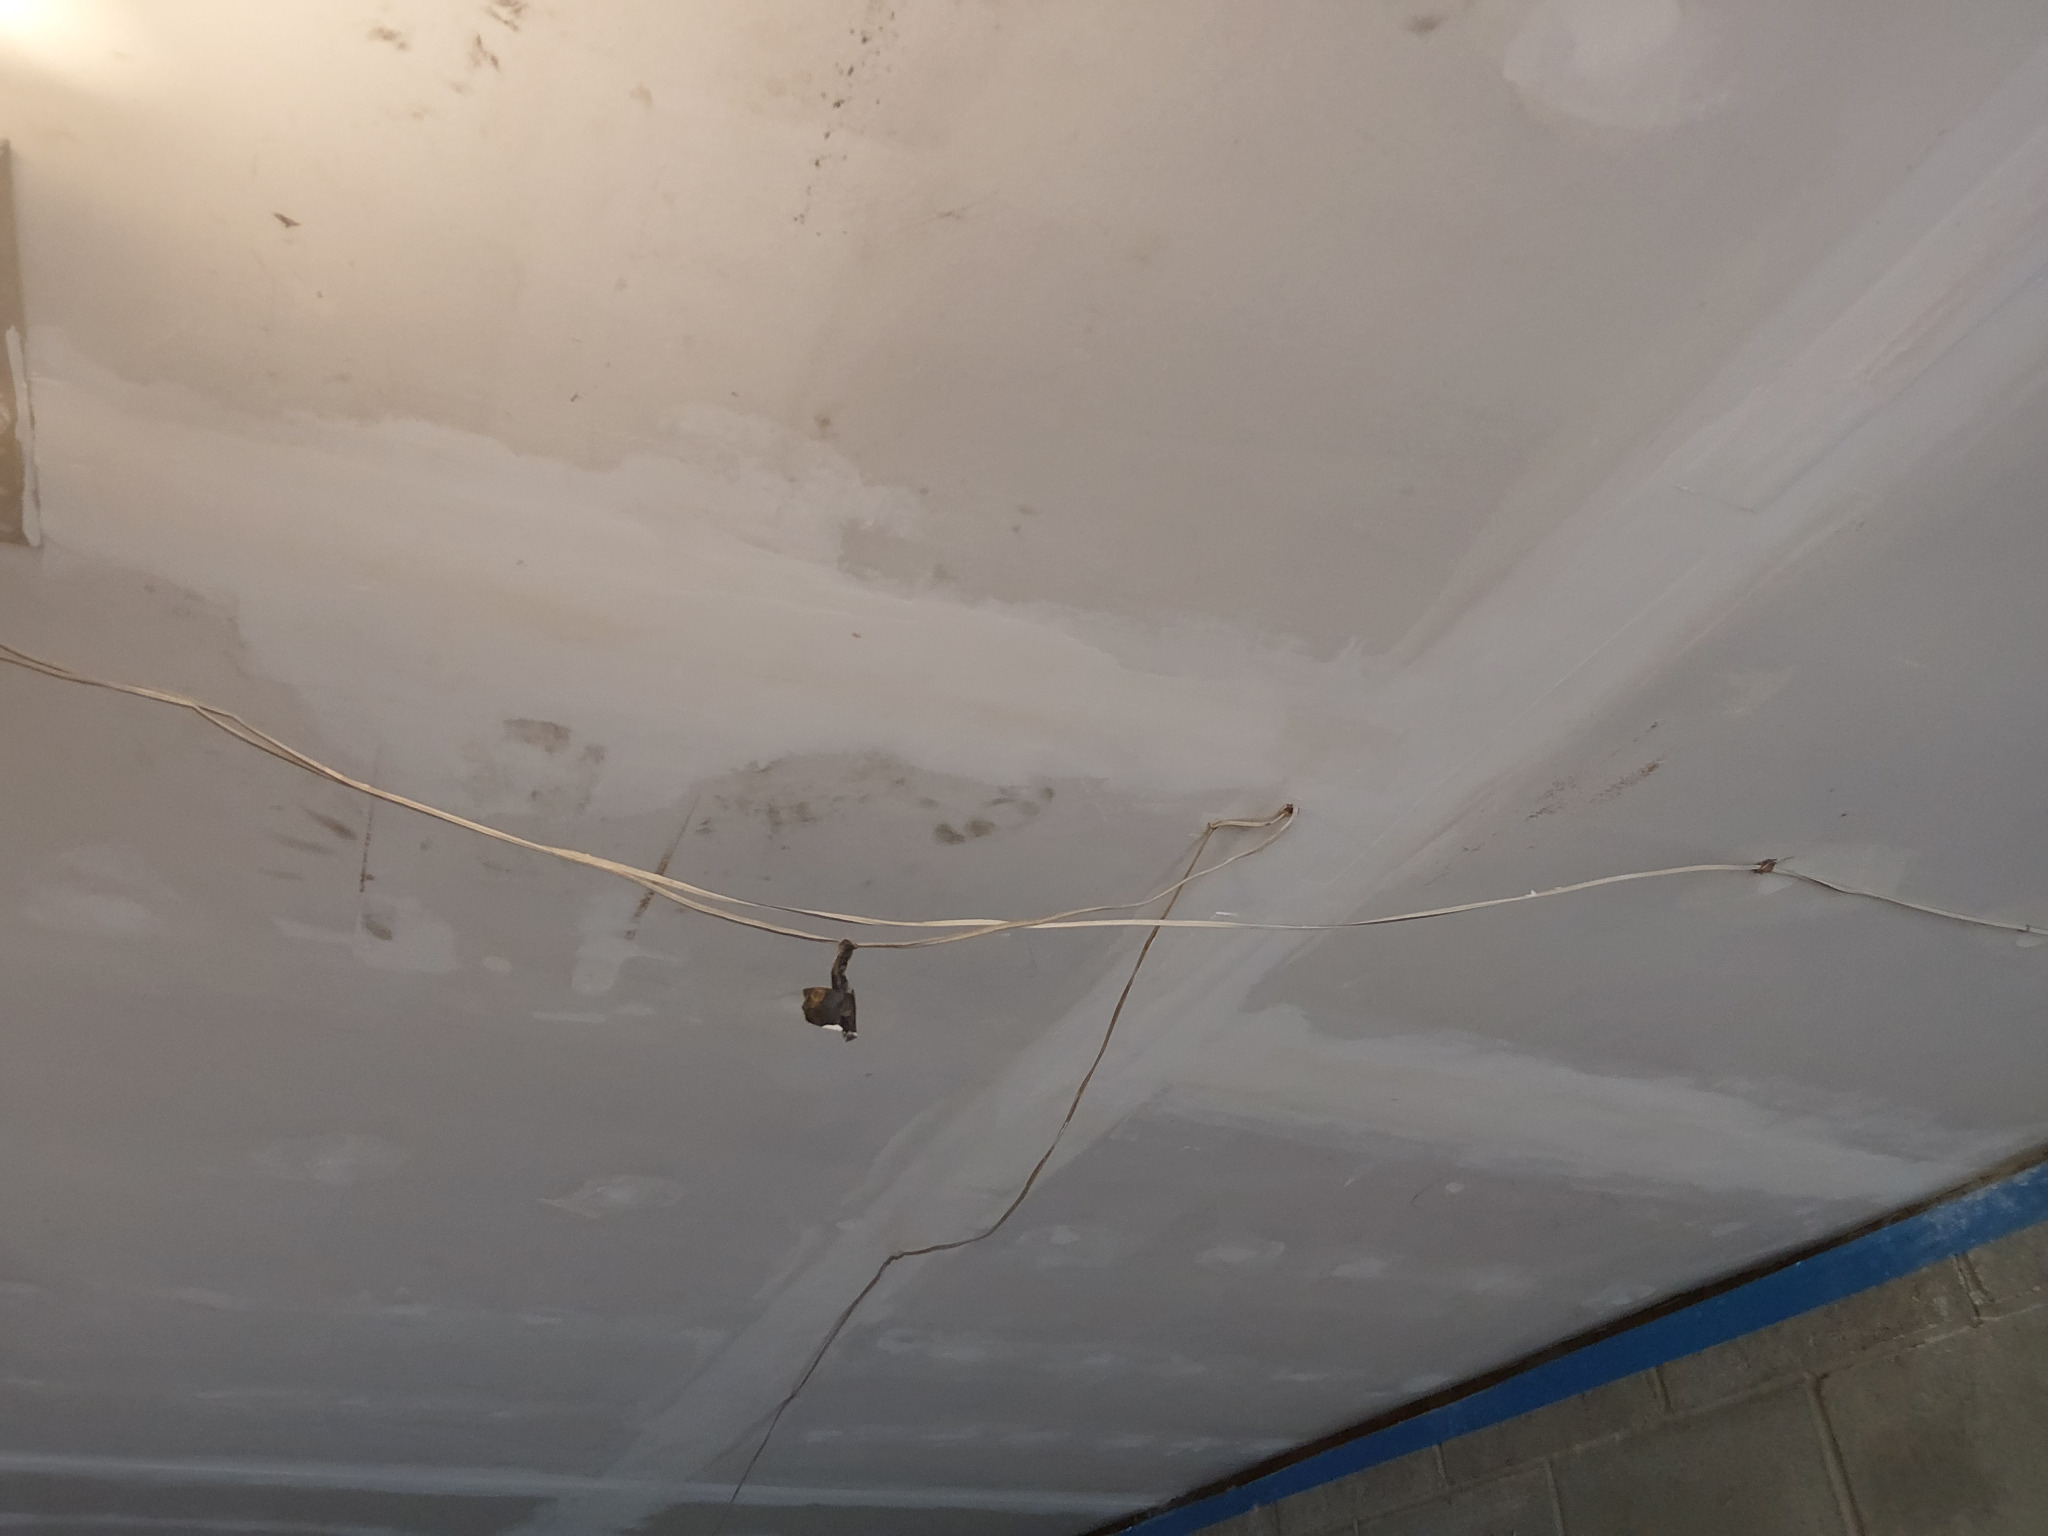
Compound finished and smoothed Wider compound work was feathered across the repaired joints and smoothed in preparation for final sanding, primer, and paint.
Drywall Taping for Garages and Practical Interior Spaces
Garages, utility rooms, basements, workshops, and practical interior spaces often need a durable, orderly finish without unnecessary full-surface over-finishing. Proper seam taping, secure corners, covered fasteners, controlled compound work, and careful sanding can make these spaces cleaner, more stable, and better prepared for primer and paint.
Finish expectations should be established before work begins. A practical garage finish, a standard residential paint-ready finish, and a high-end finish viewed under severe side lighting are not the same scope.

Multiple Coats, Feathering & Sanding
Drywall finishing is built in stages. The first application embeds tape and fills deeper joints. Additional coats widen and smooth the transition. Drying time is required between applications, and the number of visits depends on temperature, humidity, joint depth, material selection, and the condition of the installed drywall.
Sanding removes ridges, tool marks, and high spots after the compound has dried. Sanding does not correct poor shaping by itself. Clean finishing depends on controlled compound application, proper feathering, and sanding only where needed.
Paint-Ready, Not Automatically Level 5
A paint-ready scope means the agreed seams, corners, fasteners, and transitions have been taped, compounded, feathered, sanded, and prepared for the next coating system. Primer and paint are not automatically included unless they are listed in the confirmed quote.
Standard drywall taping does not automatically include full skim coating or a Level 5 finish. Full skim coating, Level 5 finishing, primer, painting, drywall replacement, and extensive correction of poorly installed wallboard are reviewed and quoted separately when needed.
What We Review Before Quoting
- Project location and room dimensions
- Wall and ceiling photographs
- Whether the drywall is already installed
- Approximate number and size of drywall panels
- Ceiling height and access conditions
- Inside corners, outside corners, soffits, and transitions
- Existing compound, failed tape, gaps, or installation defects
- The expected finish standard
- Whether primer and painting are requested separately
- Deadline and site readiness
Q: Do you tape drywall installed by a homeowner or another contractor?
A: Yes, after review. The drywall must be inspected for fastening, gaps, panel alignment, damaged edges, unsupported joints, and other conditions that can affect the finished result.
Q: Does drywall taping include sanding?
A: Sanding is normally part of an agreed paint-ready taping scope. The exact finish level, number of compound applications, and included surfaces are confirmed in the written quote.
Q: Do you install new drywall panels?
A: This page focuses on taping and finishing newly installed or unfinished drywall. Drywall hanging, replacement, and larger installation scopes are reviewed separately.
Q: Is primer and paint included?
A: No, not automatically. Primer and painting can be quoted separately and are included only when listed in the confirmed scope.
Serving Stone Ridge, New York, and the Hudson Valley
Hudson Valley Home Painters provides drywall taping, drywall repair, paint preparation, interior painting, pressure washing, exterior cleaning, and related surface-preparation services. Service areas include Stone Ridge, Accord, High Falls, Kingston, Woodstock, Grahamsville, Neversink, Claryville, Sundown, Denning, Mamakating, Pine Bush, Catskill, and select surrounding Hudson Valley and Catskills-area properties.
Need drywall seams taped, corners finished, fasteners covered, joint compound applied, or unfinished drywall prepared for primer and paint? Contact Hudson Valley Home Painters to request a quote.

